|
|
Post by rtuned on Apr 24, 2012 17:55:32 GMT 8
Currently only snap fit... took 1 week to snap fit it. Like I said in FB, not a beginner kit, and try to build like a resin kit not a plastic. Btw, there are lots of 'compliant' in my WIP... so if you don't like it, then don't watch...thanks.  Is all true that what other fourms said...worst kit ever buy and build. The box is huge, same length as any Bandai PG kit, but thicker box.  Once open, It does look like a TT HongLi model. T^T Let get the progress on... Took 1 day to fit the upper body. Lots of fitting error, so I cut all the joint part and cement it...still big gap in between 2 parts after cement. Fix that later (after complete dry fit).  Arms: The instruction is very 'blur', you need to figure out which to put first, and where to fit. =.=, and some error marked in the instruction sheet too.  hands and light saber: Hands is crude, I suggest replace it with aftermarket hands (B-club Sazabi hands). This hands look like toy hand, or cast from resin kit hands. The light saber took me some time to figure out what is that... no detail on it show is a light saber... crap! decal and others misc.  decal is nicely printed, with pre-cut. As for the misc parts (spring hose, LED lights and clear parts) Not my kind of detail...I will replced the hose, throw away the LED as it does not fit on the head. You might want to sand the clear parts and respray color on it. As for me, I will throw it away.) Side skirt:  Inside the side skirt (see the arrow), big 1mm punch marked need to cut away. (there are alot of these big punch marked everywhere. Almost all the parts.) Some minor fitting error on it, but can be fix with some shaving and trimming. Foot:  Cut all the connection point to fit better. Pict shown that it cannot fit, as the hole is smaller than the connect grey parts. Infact, there are lots of other parts had these problem too. The ball joint will be replace by aftermarket parts. Second day complete...so far. Back to earth. As tomorrow will dive back to hell...   More to come... *Is ONLY snap fit/dry fit at the moment. minor sanding and trimming to fit all the parts. There will be more to do after all parts had snap fit. |
|
|
|
Post by rtuned on Apr 24, 2012 18:21:52 GMT 8
Today, dive back to hell... 3rd day in a row. Front skirt:  Do not force fitting, I got a stress mark on one of the parts. Thanks to the wrong design on 'grey parts'. Same, cut all the joint area and snap into it. Test fitting it before glued it, trim it to fit. Is a good start for people whose like to start detailing on gunpla...because there WASN"T any in this kit.  Extra arms from side skirt:  The claw is off shape, trim it sharp or putty and shape it. The claw cannot fit into the arms becaue there are punch marked there...DUH! who will mold the punch marking on fitting area...can see how bad is that. Dremel the hole to fit. Rear skirt: 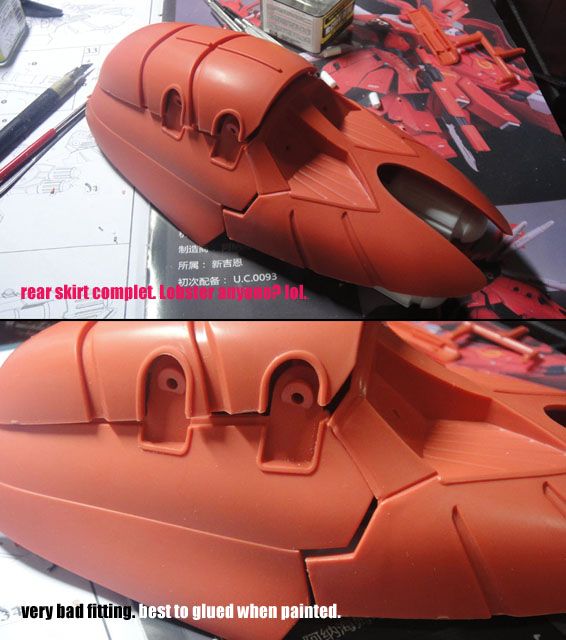 Lobster anyone? lolz. Is a very bad design on putting up all the parts. (4 big armor into 1 grey parts. suggest glue all the 4 red armor up. Big gaps everywhere, fitting also got alot of problem. If you like it, you might want to detail inside as some area could see through. I will do the detail inside... inner parts of 'lobster' skirt, long front 'johnny' (dont know what that call...)  Inner skirt got no detail on walls and grey mechanical area...(seriously, the more I get on with this, the more I think is either RC mold this kit using a 20 years old resin kit or mold it from a toy aka MSIA.) long 'johnny' (the long D*ck that between the front skirt.) marked with pencil, and I already mark it with pen knief. Need to shave a 0.5mm from it, to allow the top part fit properly. This kit armor is super thick... most of the parts are 15mm thck. I thought only resin kit need so thick, why plastic also need? @.@ Shoulder.  Is huge and same here, fitting is bad, Saw the gap in between the armor? Is hollow, no detail inside. Better do alot of work inside before glue it. The shield:  Fit problem (again!) no detail and so-call detail are all bloated. Very ugly if you ask me. At the same time, advance modeler will love it...scripting detail, pla-plating detail, add on detail..etc. The muzzle break:  You don't even know how to fit it? It actually to glue it...lolz. And the muzzle break given was not even look like one. I sand it round in front and drill bigger hole. Complete with front skirt and big 'jonny':  ok, that's all the snap fit...4th day, back to earth...Phew! Next week, I shall dive back to hell. Cheers! ;D |
|
|
|
Post by drgunpla on Apr 24, 2012 19:00:44 GMT 8
RC Nightingale = kthxbye... Tq for the heads up...
|
|
|
|
Post by rtuned on Apr 24, 2012 19:45:28 GMT 8
I seriously think RC tend to make this nightingale as resin kit not plastic. All the armor is 15mm thick, and no detail at all. But my friend told me RC make a statement saying their nightingale mold was stolen. Either they are lying or telling the truth. Stolen by TT HongLi, as the plastic kit does look like them.
Or RC is working with TT. Design it, and mold by TT. It does look like a resin kit from 20 years ago. (those resin is super thick and lack of detail on it.)
There are some RC resin kit out there, and is pretty good in fitting and detail is great too. So I don't know know why RC will go into plastic where their resin is good.
|
|
kriz
Newcomer

Posts: 41
|
Post by kriz on Apr 24, 2012 20:58:21 GMT 8
excellent wip..great annotations.
|
|
Jeffho
Newcomer
enjoy hobby
Posts: 59
|
Post by Jeffho on Apr 25, 2012 10:35:08 GMT 8
Bro! The title wrong! No nightingle... think should be nightmare!!! ;D Ya bro, like u say, seeing your wip, this is like doing resin kits! lot of thing to touch up & lot aftermarket parts (i mean a lot ;D) need to add on only can push it to another level... but the cost also going up but base on you skill should be no problem! Gambateh! Now a Sazabi Evo (plastic kit) have pre-order at some local forums, but after seeing this nightingle... i pull my hand break |
|
|
|
Post by honeymic on Apr 25, 2012 10:41:32 GMT 8
Awesome~
|
|
|
|
Post by rtuned on Apr 25, 2012 16:44:22 GMT 8
Thanks guys.... ;D Enjoying my day now...before jumping back to hell next week. hahaha...
jeff taiko... Its a nightmare, but since already got that, no point just build normal...when snap fitting on it, I found is really look like resin kit but in plastic. =.= Anyway, forgot to write some summary here... lolz.
Summary:
This kit got plenty of room for advance modelers whose love detailing, pla-plating and of course modifer. As for beginner, try not to touch it unless you wish to 'up level' your skill. Resin kit builder will not find it hard to work.
Like Jeff said, you need to dump lots of aftermarket parts to make it right. I will said this kit only give you a structure, but no detail at all. Fitting error - mostly on joint parts. Think they using Kotobukiya D-style kit joint (hexagon hole with round connection) but without precision skill like Kotobukiya, it become disaster.
This kit was not RC first release kit. There are 2 resin kit before this. FSS look-a-like Pyscho mk.I and Ora-zaku champion (blue kampfer). These 2 kit got pretty good response in resin industrial. So I only hope IF RC going to come out another plastic kit, PLEASE.... find a better caster, not some cheap caster.
|
|
yuen
Newcomer
Posts: 29
|
Post by yuen on Apr 26, 2012 2:26:01 GMT 8
wow~ finally there is a more detailed of nightMARE WIP u can make it!!!! |
|
|
|
Post by neofushion on Apr 26, 2012 13:39:06 GMT 8
......... waaaaahh. That is one huge kit with problems. Lots of problems. Point blank question "Is there a sense of fulfilment after fixing the error and seeing the size?"  . The size seems to be the only thing so far that is impressive |
|
|
|
Post by rtuned on Apr 26, 2012 19:57:11 GMT 8
......... waaaaahh. That is one huge kit with problems. Lots of problems. Point blank question "Is there a sense of fulfilment after fixing the error and seeing the size?" . The size seems to be the only thing so far that is impressive Actually not the size will make you go on... the instruction sheet come with 4 page of fully painted color 'prototype' finished kit. So that is the main thing keep your spirit go on! ;D Plus, you have to keep remind yourself, if Hong Kong and China modelers can make this 'crap' kit into a nice painted kit, why can't you? In fact, you need to build even better than them... yes? At least that what keep me going... cheers...  |
|
|
|
Post by rtuned on Apr 28, 2012 18:57:50 GMT 8
Get prepare my 'packbag' for hell dive next week... still missing some 'C4 paste' (polyster putty) ;D ;D But hope my pla-plate is enough...lolz.  This is all I left for all my gunpla/sci-fi option parts... countdown to hell... hahahahaha!!! |
|
|
|
Post by ezhappy on Apr 29, 2012 8:09:57 GMT 8
oh yea! Gambateh bro!
|
|
|
|
Post by xamel1975 on May 3, 2012 14:52:43 GMT 8
Serious schnitzel!
I got one in my stash!
When I got it, I feel that the kit looks 'cheap' in terms of surface quality. The plastic looks like cheap-grade version of ABS material rather than styrene.
But despite all the shortcomings, I believe this is, thus far, the ONLY 1/100 scale affordable and "plastic" kit of Nightingale.
Will follow your WIP closely as I plan to start build this kit in 2nd half of this year.
|
|
|
|
Post by beckylaw on May 7, 2012 2:20:11 GMT 8
Crazy lot of thing to do. Don't feel like getting this after reading this WIP.
|
|