|
|
Post by jeremy on May 4, 2013 13:30:19 GMT 8
First of all, I'm not sure is it appropriate to post this question here. But what I think is this can help us in choosing colour scheme before we painted it on a model kit. And it could directly show us the image rather than you keep thinking in your mind. There are a lot of editor software but most of them don't have the exactly tutorial to teach you how to use it. Random tutorials on youtube might not able to answer your question. Straight to the topic, what I'm going to ask is how do you guys changing the colour by using a photo editor software. For example, I took the photo from zerogunz forum by sammy. This showing the before and after using editor, it have such a good result which you can see the blue colour changed to green perfectly, with light reflection and shadowing from original photo on it. 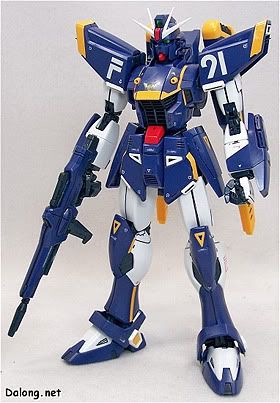 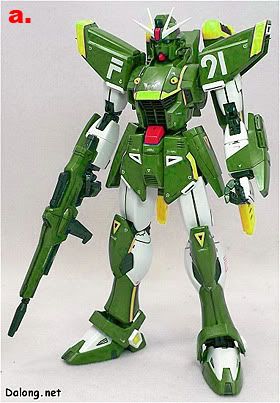 I guess it was a simple edit, no brushing or colour filling required. I just don't know the steps to change blue to green. I hope there is someone kind enough to guide me or provide me some really good tutorial either own made or from the internet. It is not that I didn't do research before post a question here, is I really can't find any tutorial that able to solve my questions. So, your help will be greatly appreciated! |
|
|
|
Post by banzai on May 4, 2013 13:52:37 GMT 8
First a few questions.
What photo editing program are you using? Adobe PS, GIMP? Which one? Operations and names of tools in the photo editor program depend on which program you are using.
From what I can see the picture you have posted is a result of selective colour correction, probably dividing the blue channel as a selection of sorts. Its not a difficult operation but if order to do this you'll need to learn some basic concepts about how an image processing software works... The biggest concept you'll need to get your head around is selection and how it works. Basic knowledge of colour channels, saturation and black/white levels as well. This kind of colour correction rarely involves paint. Its more about adjusting the colour spectrum on selected/masked sections until the desired result is achieved.
So... I'll need to know first of all, what program are you using?
|
|
|
|
Post by jeremy on May 4, 2013 14:06:14 GMT 8
Sorry, I forgot to mention any software is just fine as I can download it. But preferable GIMP because I have it in my laptop now.
|
|
|
|
Post by banzai on May 4, 2013 14:49:00 GMT 8
Okay cool, first a couple of video tutorials you should look at to familiarize yourself with the basic tools you'll need to use GIMP more effectively.
Tutorial 1 : Layers
Tutorial 2: Selection and Masking
These tutorials aren't that extensive but they'll give you basic knowledge of what you'll need to know before starting to use the program for your different needs. These tutorials aren't exactly for what you want, they just introduce you to some of the basic concepts.
Now for colour correction -
Bear in mind this is just ONE way to shift your colour hues for an object. This is the reason I'd rather you go through the first 2 tutorials first. Learning to manipulate the layers and selection/masking tools will give you the knowledge to retouch colours in a variety of different ways.
Method A: The basic steps you'd make to colour correct are -
1) Select area to edit
2) Use colour correction to edit the colour.
Note that method A is a direct approach but it is a destructive one. When you are done the original image is changed and the only way to get back the original is through multiple undos or reloading the file. However, here are variations on how you'd do that, just to give you an idea on how you could do this in different ways without permanently changing your image.
Method B: Non destructive colour correction ver 1.
1) Select area to edit.
2) Create new layer on top of original image.
3) Fill selection with new colour
4) Change layer transfer mode to "tint" original image.
OR
4) Inverse selection
5) Copy selection from original layer to new layer.
6) On the new layer inverse selection again, delete everything except the selection (The eye for instance.)
7) Desaturate (Remove colour) and recolour.
Those are 2 ways. There's about 50 more. I don't want to overwhelm you... For now what I've shown you should be enough for your purposes.
Just so you know, image processing programs are not simple tools that you can jump in and learn in 20 minutes... If you really want to get GOOD at photo retouching, it takes time, patience and dedication. Just like... Scale modelling. ;D
|
|
|
|
Post by jeremy on May 4, 2013 15:30:46 GMT 8
Thank you very much.  I will read it afterward when I'm free and practice it. If I found any trouble, can I ask you? |
|
|
|
Post by banzai on May 4, 2013 21:36:38 GMT 8
Of course, but I must warn you... I'm very long winded.  |
|


 I will read it afterward when I'm free and practice it. If I found any trouble, can I ask you?